| Mediterranean Garden Society |
» Home
|
Propagation from cuttings Making plants from plants is a subject close to most gardeners’ hearts, and here in the mediterranean-climate areas we are no different. Our green-fingered friends seem to know by instinct how best to break off a piece of an interesting plant and make it grow, but the rest of us need guidance. Below you’ll find that in abundance. First of all garden designers Jennifer Gay and Piers Goldson give the basic information about the taking of cuttings. Then other members give their personal experience and their sometimes unorthodox methods of propagation. A commercial rose grower reveals his way with traditional roses. Three techniques for cuttings Perlite: how to use Perlite and cuttings Propagation by cutting for non-green-fingered gardeners – my experience so far The nursery at Sparoza Traditional rose varieties - propagation from cuttings Propagating in the Mediterranean Jennifer Gay and Piers Goldson are both past Garden Assistants at Sparoza and have gone on to be successful garden designers in Greece. At the MGS Symposium in Athens in November 2007, they gave a workshop on propagation and here is the part of their notes concerning propagation from cuttings, including layering: An introduction to taking cuttings
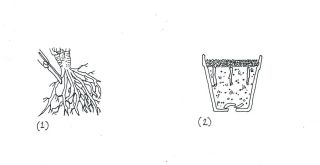
Cuttings can be treated with a rooting hormone (auxin) to increase their propensity to form roots, to hasten root initiation and to increase the uniformity of rooting. Plants that root easily do not benefit from an extra supply of auxin, and it is best to save rooting hormones for those that are difficult to root. 1. Root Cuttings Keep the cuttings dry to prevent them from rotting. Root cuttings can also be taken from woody plants which have a tendency to sucker from the roots such as Albizia, Aralia, Catalpa, Chaenomoles, Populus and Robini. Acanthus mollis and perennial poppies also propagate successfully with this method.
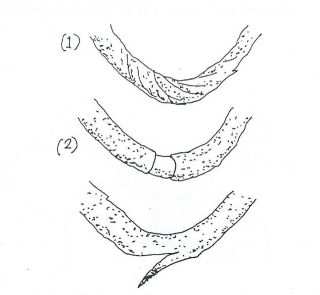
Select small lateral roots for cuttings. When cutting the roots, trim each section straight across the top and slanting at the base in order to distinguish the top from the bottom (1). Insert the cuttings into compost the correct way up so that the top is level with the surface. Cover the compost with a 1 cm layer of gravel (2). 2. Softwood Cuttings 2.1. Nodal Cuttings
Gather softwood cuttings early in the morning and have everything ready in advance so you can insert them without delay. Trim the stem just below a leaf joint (here Pelargonium) and remove the lower leaves from the cutting (1). Insert the cuttings in sandy compost (2) (stand the pot in water first so that it is thoroughly moist). 2.2. Internodal Cuttings
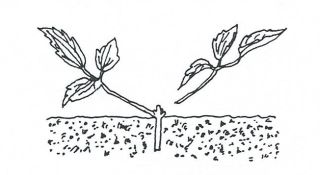
This technique is used for climbing plants with a lengthy stem between the leaf joints or internodes. Trim above a leaf joint and insert about 2-3 cm of stem in gritty compost. Remove some of the leaves to cut down on water loss. 3. Semi-Ripe Cuttings
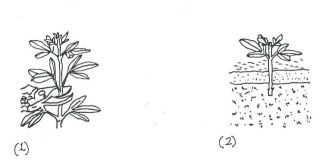
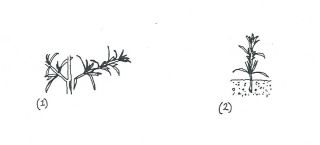
Trim the stem immediately below a leaf joint (here Choisya) and remove the lower leaves from the cutting (1). Dip the base of the cutting in rooting hormone powder and remember to tap off any excess. Insert the cutting through the layer of sharp sand so that the base of the stem sits just below the surface of the compost. A number of conifers and evergreens will root more reliably if cuttings are taken with a heel. This means pulling side shoots from the main stem so they come off with a small strip of old wood known as a heel.
Pull off a young side shoot (here rosemary) in such as way that a strip of the previous year’s growth is attached (1). Trim off the ragged tail of the heel, dip in rooting hormone powder, remembering to tap off any excess, and insert in gritty compost (2). 4. Hardwood Cuttings
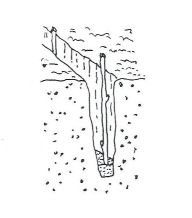
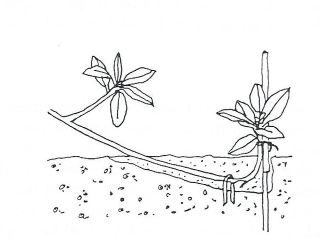
Insert hardwood cuttings in a V-shaped trench in open ground. Backfill with soil and firm in. The layer of sharp sand or grit at the base ensures good drainage so the cutting does not rot. 5. Layering Constriction must be induced within the stem to restrict the natural flow of auxin which acts as a rooting hormone at the point of restriction. The exclusion of light is thought to speed up the production of wound tissue and hence increase the speed of rooting. In autumn, late winter or early spring select a strong new stem that will reach down to ground level and prepare the soil at this point by forking in garden compost and grit. Pull down the stem and constrict it to encourage root formation, either by making a slanting cut a third of the way through, twisting the stem or girdling it. Peg the cut branch down into the prepared soil with the end tied vertically to a stake. Water in dry weather. The developing layer may produce sufficient root growth by early summer, though sometimes it takes a year or two. Sever the layer as close to the parent plant as possible, and after four to six weeks carefully lift it. The layer can either be placed in its permanent position, or containerized and grown on.
This is a reliable method of propagating shrubs with low-growing branches such as magnolias, Photinia, bay and lilac. Climbers can be increased by pulling down a long shoot, wounding the stem and pegging it down.
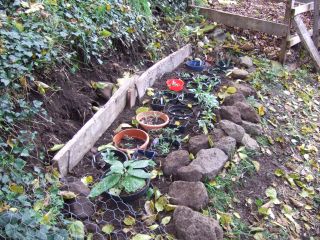
Twisting is achieved by rotating each end of the stem in opposite directions and pinning down. Three techniques for cuttings The last time I wrote in The Mediterranean Garden (No. 62, October 2010) I dismissed the idea that it was worthwhile for an occasional gardener, that is, one who is away from the garden for most of the year, to propagate plants in a mediterranean climate. As soon as I emailed the article to the editor I began to wonder whether this was true. I know now that it isn’t. For a year I have tried to grow plants from cuttings in our garden in the Languedoc, using three different techniques. While there were some failures, the successes have given me huge joy, and a number of viable plants. The year I chose for my trial, 2011 to 2012, was a testing one from the point of view of the weather. I potted up my cuttings in September 2011 and left them in three different settings, described below. I watered them once and left, expecting the autumn rains to take over. Instead the dry weather lasted until mid-October, when it rained for three weeks. A further dry spell followed, lasting from November to March 2012. In that February the temperature fell to minus 9 degrees Celsius at night and failed to rise above freezing for two weeks, while 100 km/hour winds blew from the north. From March growing conditions became ideal for those plants still alive. It was warm with substantial rain at least once a month from March right through until July, when the rain finally stopped until September. Having potted the cuttings out in September 2011, I was in the Languedoc again in November, when they did not need watering, in February when I didn’t dare water for fear that the plants would then freeze, in April, and in June when, again, they didn’t need watering. So they really looked after themselves after their initial watering. The three settings I chose were a plunge bed, a crevice garden, and plastic pots with a water reservoir. All three were sheltered from the wind. The first two were open to the rain while the third were placed just inside the open door of a former pigsty. A plunge bed is made by digging out a trench as deep as the pots are tall, placing the pots in it and filling the gaps between the pots with sand, leaving only the tops of the pots showing. The idea is that the pots will absorb moisture from the earth beneath them and dry out much more slowly than a pot that is exposed. It will also keep them warmer. I dug the bed in light shade in the least dry part of the garden, but it is still fairly dry, being on a steep slope whose terraces are held in place by drystone walls. In fact I used soil not sand between the pots but regretted it later because the growth of weeds in the soil rather dwarfed the cuttings in the pots. My first inspection of the plunge bed in November was a shock. First, the white plastic labels had all disappeared, although I later found a few some yards away. I suspect magpies or squirrels. Fortunately I had a map of the pots and could still identify them. Second, the bed was covered with leaves from the ash, mulberry and Montpellier maple trees that were providing the shade. However, once leaves and weeds were cleared almost all the cuttings were showing some growth. I covered the whole bed with wire netting and had no more trouble with leaves. The cold dry winter coped with the weeds.
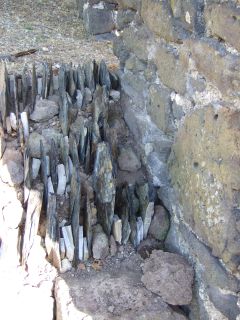
The crevice garden is a small bed in full sun into which I have sunk slates placed vertically so that most of their height is underground. The idea comes from the observation that a crevice in a rock which is deep enough to hold water will often house a plant despite the most arid conditions around it. Even when there is no rain, moisture may form on the exposed slate from mist or dew and slide down the slate’s surface into the soil. Without the slate the water would stay on the surface of the soil and evaporate in the sun. In addition, angling the slates east-west gives a small patch of shade where the cuttings can be inserted into the soil. The most influential crevice gardener is the Czech, Zdenek Zvolanek, known as “ZZ”. It was his huge crevice garden at Wisley that inspired me.
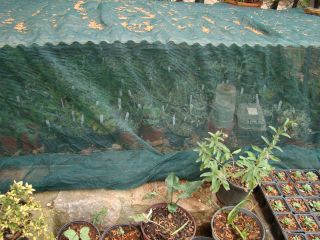
To make my reservoirs I took one- and two-litre plastic bottles, cut them in two horizontally, threw away the cap, turned the top half upside down and jammed it in the bottom half. Water poured in through the top collects in the bottom half while potting compost tipped into the top half stays there, suspended above the water. Cuttings are put into the compost which is kept moist by the water below. ResultsThe reservoirs were ultimately a complete failure, despite staying moist throughout the year. As the old surgical joke goes, the operation was a success but the patient died. In November most of the cuttings were thriving: several different sedums, Rosa banksiae var. banksiae, Arbutus unedo, Salvia fruticosa, Helichrysum orientale, mallow and ballota. Only the Elaeagnus × submacrophylla (syn. E. × ebbingei) had failed, which was odd because the elaeagnus cuttings that I had stuck straight in the ground at the same time had survived (only to die later in the cold). By February all cuttings were growing but looking less happy: pale and spindly, which I attributed to the poor light in the pigsty. I kept them there, however, because, if moved out of doors, the reservoirs would have been flooded if it rained. By July they had all died, despite being in moist but not sodden soil. I was puzzled until I tipped the compost out and smelled the unmistakeable sickly smell of anaerobic decomposition. By sealing the water in I had deprived the compost of any exposure to oxygen and when the oxygen in the soil ran out the plants died. Had I not sealed the water in it would have evaporated, so I don’t see a solution to this (except perhaps a drip hosepipe which I am trying now). The crevice garden was more successful. Half the plants survived: Gormania spathulifolia (syn. Sedum spathulifolium), Sedum spurium and S. kamtschaticum, Delosperma cooperi, Sempervivum ‘Red Delta’ S. ‘Jet Stream’, S. ‘Spring Mist’, and S. tectorum. Some of the failures were predictable – Saxifraga burnatii and S. longifolia ‘Tumbling Waters’ – but others surprised me: Delosperma congestum ‘Gold Nugget’, D. densum, and Sempervivum arachnoideum. The plunge bed was the most successful, with well over half the cuttings ready to be planted out at the end of the year: Gormania spathulifolia ‘Purpureum’ (× 8), Sedum spurium, S. tetractinum ‘Coral Reef’, Aucuba japonica, Phlomis fruticosa (× 5). Only the cotoneaster, Salvia fruticosa, Hertia cheirifolia (syn. Othonna cheirifolia), Arbutus unedo and the rosemary died. The rosemary was a real surprise because I usually just stick cuttings into soil in full sun, water once only, and they almost always survive. Perhaps it was the light shade that killed them. Of course, if I were doing the trial now I would do it differently. I would put several cuttings of each plant in each of the three sites, for a proper comparison. And perhaps in a different year the results would have been different. But I do feel I’ve come to conclusions that will guide my future attempts:
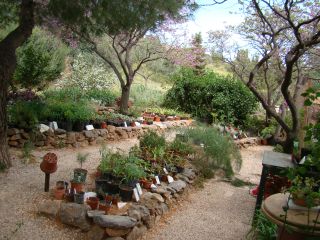
More photographs from Andrew’s trial. Perlite: how to use Perlite is a most useful, sterile substitute for sand in all kinds of potting composts. The white, lightweight aggregates are produced by heating a volcanic mineral to 1,000 °C. The small particles have two important, beneficial advantages for pot-grown plants. The surface absorbs a large amount of water, which is slowly released, and the particles greatly assist in compost aeration. Their size and structure help to prevent pot composts from compacting, thus enabling the roots to breathe, with an easy exchange of gases. Rooting cuttings Perlite and cuttings …perlite and cuttings: as easy as falling off a log and a success rate of 99-100%. I have those plastic oblong ‘jardinières’, the deep ones; they measure 98 cm by 22 cm with an inside depth of 18 cm. I fill one with perlite, water it well, let it drain, and stick in the cuttings. No rooting powder or hormones, they’re absolutely not necessary. Water every day and when the temperature is over 30°C it may need twice a day. The water drains straight through but the perlite retains moisture, thereby avoiding the roots drying out. I have never had die-back using perlite as there is no waterlogging. I leave them as they are for five to six months before gently tipping them out on to a large plastic sheet and teasing the well-developed roots apart. I plant them into small pots filled with my own mix: one part sieved earth, one part peat, and two parts perlite,; I water well and thereafter only when necessary. So cuttings taken in March are potted up in October/November. All my present cuttings are in the greenhouse which has that special yellow plastic which cuts the sun’s rays and keeps down the heat. The doors and windows are open so they are quite safe from the elements. They will go back into the greenhouse after being potted up and next year in early summer they will be potted on and left out under the shade of the trees. They will be ready to plant out that autumn. Propagation by cutting for non-green-fingered gardeners – my experience so far It was Olivier Filippi who encouraged me to start propagating with a passing comment as I stuffed my suitcase full of plants from his nursery: “Buy one of each and make more from cuttings,” he suggested. I took him at his word, and although I’m still quite a good customer at my favourite nurseries, when I planted out four new beds this autumn/winter I reckon that 60 – 70% of the plants planted were home-produced. So as I potted on yet more pots of rooted cuttings this spring I took a mental stock of what I’ve learnt by experience over the past five years. I’m certainly enjoying the process more now that I’ve worked out my own methodology and got rid of the main frustrations.
It’s supposed to be fun Make it simple Choose healthy, straight twigs of 10 – 12 centimetres in length and trim to below a leaf node. if there’s no choice 6 cm will do but ignore the leave node rule and pull off the shoot with a little of the ‘skin’ of the stem. Cut or rub the leaves off the lower third to half of the cutting and if the tip is too floppy thumb-nail it off. Fill a 15cm pot with a mix of about half and half bought potting soil and vermiculite. I do believe that my success rate has improved since I changed to this mix but I must admit an additional plus is that I find it aesthetically pleasing the way it sparkles. Also when the time comes to pot on the cutting it’s easy to knock of the vermiculite mix when you’re trying to disengage the roots. I collect up the knocked-off mix and save it for next time. If you can only get perlite that’s good too, and it’s produced in Greece. Back to our cuttings. Poke the cuttings around the edge of the pot only. Six-eight per pot, depending on its size, is enough. Just because you have more material doesn’t mean you need to fill pot after pot or jam lots of cuttings into one. Exercise restraint. Write a label with a fine-nibbed paint marker noting the name and the month and year the cuttings were taken and anything else of interest, especially if it’s from someone else’s garden. In my experience only a paint marker can withstand a season of mist watering followed by a life in the sun. Soak the pot in a bucket or baby bath up to its rim. Drain and put in a shady, protected place preferably with automatic watering for the simple-lifers. Accept failure *The Nursery Stock Manual by Keith Lamb, James Kelly & Peter Bowbrick, Grower Books (A division of Nexus Media Ltd ); Revised edition July 1995. The nursery at Sparoza When I arrived at Sparoza in September 2009 I found a small but well-stocked nursery. A few weeks later, after a successful MGS plant exchange, it was sadly depleted. Knowing that we had a repeat performance to look forward to in April, I wondered how we were to restock in time. I needn’t have worried. As Sally, the volunteers and I snipped and clipped our way round the garden, Sally would instruct me to take cuttings of this or pot up divisions of that. Failures amongst the divisions were few and far between and nearly always a result of my being greedy, trying to get more from the plant than it was willing to give. The cuttings too rooted well on the whole and soon I was potting them up and adding to the neat rows in the nursery. Then as winter turned to spring I noticed that my results were less than impressive. Many plants I considered easy were giving poor results or failing completely. At this point I feel I should add that I have been a professional horticulturalist for 30 years, both as a nurseryman and gardener. This said, I should also point out that my horticultural experience outside the UK has been limited to a few days creating a herb garden in the Brazilian jungle and filching oleander cuttings from a hotel garden in Spain. At the request of the MGS Secretary I shall digress here to tell you about a useful way I discovered to get cuttings back home safely when travelling. On one Mediterranean holiday I noticed some particularly attractive forms of oleander. We had some pink-flowered ones at home but single white, crimson and cream forms caught my eye along with some exciting doubles. On the last day of my holiday I walked around my chosen shrubs and discreetly selected my cuttings. Looking around for a suitable container, I remembered that I had a water bottle in my rucksack with just a few centimetres of water left in it. As I sauntered about trying not to look suspicious I popped each cutting into the bottle, giving it a shake every now and again to ensure that the cut stems were all reaching the water. Back in the hotel room, with the lid securely tightened I laid the bottle in the middle of my suitcase, well padded with clothes. Once back home one can simply cut the top off the bottle and deal with the cuttings in the usual manner. In my case I didn’t have time, so left the bottle on the worktop in my kitchen – a warm and light room – but out of direct sunlight. All I did was loosen the top. By the time I got around to doing something with them they had all rooted in the water, so I simply potted them up and put them in the greenhouse. Back to Sparoza. With my dying cuttings becoming a bit of an embarrassment to me, I put my thinking cap on. The hotter days we were having were obviously putting too much strain on the plants and I needed to improve the system. When Sally chose the site for the nursery she chose well. Shaded by pines, Cercis and Brachychiton and partially screened by the old dog kennels, the young plants are afforded some protection from the frequent drying winds and hot Greek sun. To novices to mediterranean gardening like myself, the value of shade is often overlooked; after the obvious water issue, shade can be the difference between success and failure when one is trying to establish plants in hostile environments. Because the nursery is close to the house and main drive, the daily attention it requires is also made easier. It is also very convenient for loading and unloading provisions and plants in and out of vehicles. The small propagating area in the nursery is part of an old dog run which is secure against stray dogs and wandering tortoises. Visitors to Sparoza will know that the place is not exactly bristling with technology and the nursery is no exception. Aware that Heath Robinson would feel at home here, I set to work on creating a more cutting-friendly environment. I remembered a propagation system of sun tunnels developed by the UK government-funded ADAS some 25 years ago which I copied successfully in my own nursery. I have now remembered, albeit too late, that I had further developed what I called a dry frame for more difficult silver- and grey-leaved plants. Genera with waxy foliage such as Dianthus did well under this regime too. The sun tunnels were a ‘root or rot’ system. Many things rooted in days or died equally rapidly, saving me weeks of wondering ‘will it or won’t it?’ Rooting cuttings of course need the correct balance of light, water and air. With sun tunnels you almost boil the cuttings alive. Get it wrong and disaster loomed. Too little shade and the plants cooked, while too much ventilation resulted in dry air and the plants desiccating. It was certainly labour-intensive (in my system at least) although modern mist and fogging systems could make it much less so. The cold frames I had been using here consisted of no more than metal poles topped with corrugated plastic. The sides were open and the floor pea gravel. While this worked well in late autumn and winter, keeping excess rain off the cuttings, it was now providing too hot and dry an atmosphere. For my first attempt I found some green nylon shading material and enveloped the frame with it, weighing down the sides with heavy metal bars and rocks. I chose the frame in the shadiest corner of the dog run, which only gets the early morning sun. Success was almost instantaneous. The cuttings were religiously damped down each morning and regularly checked over. The atmosphere in my new frame was warm and moist and felt ‘right’. I avoided damping down in the evening as the nights were still cold and I preferred that the foliage should be dry as the temperature dropped. I should add that I also changed the compost I was using. All the plants in the nursery at Sparoza are potted in either a 50/50 mix of the rich red ‘terra rossa’, of which we have a small mound behind the nursery, and cotton waste. Sally buys both in bulk every few years or so. Occasionally the cotton waste is replaced by our own compost from our compost pits, but generally we prefer to preserve this precious source of humus for the garden itself. The plants seemed to do well in this mix although I now add about 10% by volume of perlite. This helps to stop the soil compacting so much and aids drainage. For the cuttings and seeds we were using a mix of sterilized loam-based compost and a cheap multipurpose soilless compost. This, I felt, was partly causing the rooting problems, so now the mix is roughly one third of each of these two ingredients and one third perlite. This feels ‘crunchy’ to the touch and I have to admit to judging it by eye rather than using exact measurements. I also bear in mind what I’m trying to propagate – silver and grey plants and succulents get a more gritty mix than other plants. My personal preference would have been to use vermiculite or sharp grit but I have been unable to find either here in Attica and actually the perlite has done a perfectly satisfactory job. Buoyed up by my success, I started potting our new little plants and our towering stacks of pots started shrinking at an alarming rate. But then disaster struck again. Fresh from their little utopia, my cuttings were ill-equipped to face the harsh reality of nursery life. A particularly hot and windy Sunday sounded a death knell to many. It was soon clear which parts of the nursery provided enough protection and which areas should be reserved only for tougher and larger plants. Some years ago Derek Toms made a shade house where Sally and I tend to put our pots of seeds and it provides a useful space for freshly germinated seedlings. One of the first jobs I did when I arrived at Sparoza was to re-roof this structure with a new roll of split bamboo. I didn’t have enough green netting to envelope the second of our frames entirely, so redesigned the system so that the netting would cover the plastic roof and provide a curtain for the front. I salvaged the old roof of the shade house and made a back and sides out of it. Where the netting didn't quite reach, more bamboo was used to provide extra shade. I was aware that my original frame, so weighed down with iron bars, was well nigh impossible for Sally to gain access to. The curtain front on ‘mark 2’ is an altogether more user-friendly access point. The rationale behind the second frame was that, by providing different amounts of shade and humidity, plants could be moved from left to right so that by the time they reached the extreme right they would be well rooted and hardened off ready to face the outside world. In addition to this I had discovered the more favourable parts of the nursery, so each batch of potted cuttings spends a week or two in these areas before being moved to their permanent residence.
I am now happy with the system, but could I improve on it? Several things strike me. First, if I were staying in Greece for July and August, I would probably call a halt to propagation until September at the earliest, thus avoiding the immense problem of the hot dry atmosphere. I would also add more shade as the temperatures rose. A coarse sand or capillary matting floor would be better than the pea gravel currently in use, providing a buffer against too much or too little moisture in the pots by capillary action. As I write early in June, it’s raining and the temperature is fairly pleasant but as soon as it returns to normal temperatures I would expect to damp down two or three times a day. The nursery at Sparoza is not a commercial concern. Its primary value is in providing Sally with plants to use in the garden here. If she has a surplus, then she makes them available to MGS members attending the twice yearly plant swaps.
As I prepare to leave Greece for my new life in France, I am aware that in my enthusiasm to propagate many of Sparoza’s treasures, I have left something of a poisoned chalice for Sally. All the little plants will need a lot of attention during the summer, when Sally traditionally manages Sparoza without any help at all. I just hope she won’t be cursing me and, if she is, that I will be forgiven if the September plant exchange is even more successful as a result. A recent visitor to the garden commented favourably on the nursery, and then added, ‘Well, I suppose that’s your thing, isn’t it?’ And yes, I suppose it is my ‘thing’. Traditional rose varieties - propagation from cuttings
* Volcanic material (pumice or volcanic ash) also known as pozzolana, predominantly composed of fine volcanic glass. |
 |
|